
Dedicated Servers
Dedicated servers in Space Engineers allow players to connect to a third party host, rather than using a player-host, in a peer-to-peer set-up. They are game instances intended for long time multiplayer games. They don’t depend on any player and they run without render and visual/audio effects. This will result to a faster connection and a more fluent multiplayer performance with less lag.
Dedicated servers are available for everyone who owns Space Engineers. You don’t need an extra Steam account, you get Space Engineers dedicated servers for free with your existing Space Engineers account.
Note: In order to run a dedicated server, server providers don’t require a licensed copy of the game. However, to obtain the game server files, at least one Steam account needs to have a valid license.
OFFICIAL DEDICATED SERVERS HOSTS
If you don’t want to host a dedicated server yourself, you can rent one from our official hosts:
The official Server Host for the Space Engineers PC version is GTX Gaming

The official Server Host for the Space Engineers XBOX version is Nitrado
![]()
DEDICATED SERVER GUIDE
REQUIREMENTS
a) A Windows PC with administrator account (only if the server will be run as a service)
b) .NET Redistributable 4.8 or higher
c) Installed Visual C++ Redistributable packages 2013 and 2017. You can download them here – https://www.microsoft.com/en-us/download/developer-tools.aspx
DS Minimum:
CPU 3.2GHz, 3 logical cores
6 GB RAM
5 Mbps bandwidth
DS Recommended:
CPU 4.5GHz, 3 logical cores
10 GB RAM
Static IP address, if you intend to host the game publicly, so that anyone from the Internet can connect to it.
INSTALLATION
a) On PC with Steam and Space Engineers
Go to your Library/Tools, search for Space Engineers Dedicated Server and install that.b) On PC without Steam.
You can install a dedicated server with SteamCMD https://developer.valvesoftware.com/wiki/SteamCMD
App ID for SE DS is 298740
Command line: “steamcmd.exe +login anonymous +force_install_dir somedirectorypath +app_update 298740 +quit”
QUICK SERVER SETUP
a) Basic setup as a foreground process
-Run SpaceEngineersDedicated.exe
-Choose “Local/Console” item in list of servers
-Click “Continue to server configuration”
-Here you can set variety of options. They work the same way as in the game.
-Fill in the name of the server and world name
-Press “Save & start” and you are ready to play
b) Setup as a service
-Run SpaceEngineersDedicated.exe as an Administrator
-Press the “Add new instance” button
-Fill in the name of the service (must be unique system-wide)
-Choose the service you just created from the list of server instances
-Setup your game the same way as with a foreground process
-Pay attention to ports in “Server settings”, as a single port can only be used by one server instance
USER INTERFACE

1. Server list
Here you can see the list of the server instances. There’s always one instance named “Local/Console” and optionally several other instances with custom names. The “Local/Console” instance is run on foreground as a standard application and is always there, while the other instances that the user creates are run in the background as Windows services.
2. Global configuration
Here you can set, whether the game log files should have dates appended to them and whether the server should automatically send the log files to Keen Software House upon crash.
3. Administration warning
This message is shown when the application is not run with administrator rights.
If you want to create or manage the server as a service you need administrator rights. The button “Run as Admin” will restart the application with administrator rights.
4. Buttons
– Add new instance – Creates a new instance of the dedicated server as a Windows service.
– Remove instance – Removes an instance of the dedicated server
– Continue to server configuration – Starts server instance configuration utility for the selected instances
– Exit – Closes the configuration utility
SERVER MANAGEMENT
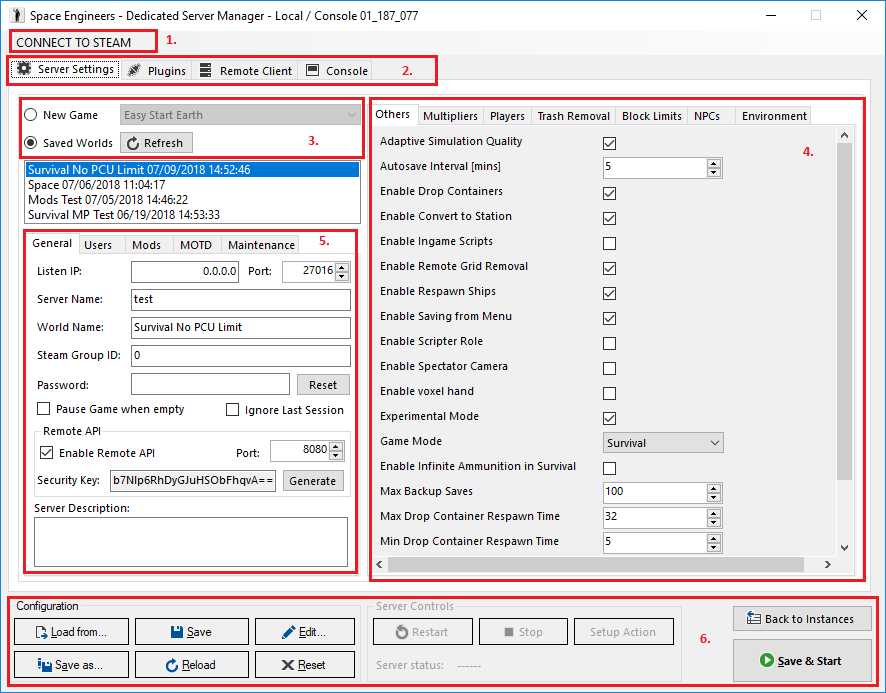
1. Connect to Steam
Some of the features of the UI are using Steam to help users to fill correct values. You can connect to Steam to get your friends and mods lists. To be able to use this you have to be logged into Steam on that machine.
2. Features
There are 4 main features on the UI:
- Server Settings
- Plugins – Server plugin management
- Remote Client
- Console – Console output for running server
3. New game / Saved worlds option
Lets you choose between starting a new world generated from a scenario or loading a previously saved world
The previously saved worlds are loaded either from the “AppData\Roaming\SpaceEngineersDedicated” folder in your home directory (e.g. “C:\Users\John.Doe”) or from the “ProgramData\SpaceEngineersDedicated” folder in the system root. To be able to play a world on the dedicated server that you previously created and saved in the game, you will have to copy it from your save game directory “AppData\Roaming\SpaceEngineers” to the respective folder
4. Game settings
Scenario – Can only be chosen for the “New game” option.
Other settings work as you know them from the game with the added bonus that you can set the numerical options to any value you want.
(Warning: Values out of the range allowed by the game user interface are not tested and officially unsupported. They can seriously affect the game experience and performance)
5. Server settings
General
Listen IP – Address of network interface that the server will listen on. This can be set to “0.0.0.0” (which is the default value) to listen on all interfaces, which should work fine in most cases
Port – Number of the port that the server will listen on
Server name – Name that will be shown in the server list
World name – Name of the world, which shows up in the server list
Steam Group ID – If set to non-zero value, the dedicated server will only be visible for the given Steam group
Password – Password for the server, if you need protected private server
Remote API – Remote API for controlling server with VRage Remote Client
Server Description – Describes your server
Users
You can select Admins, Banned and Reserved slots users on this tab. You can use your friends list or from history of the world.
Note: By “Steam ID” we mean the unique numerical identifier for a Steam account in the 64-bit format. Your Steam ID in this format can be found in the game log after running the game with Steam logged-in to your Steam account (see above) or using external tools like http://steamid.co/ or http://steamidfinder.ru/
Mods
You can select Active Mods on this tab. You can use your Subscribed Mods list from Steam.
MotD – Message of the Day
You can fill Message of the Day and Message of the Day URL on this tab. This message will show up to every player, when connected to the server.
You can use variables in the content of the MotD. Use the context menu of the text field to insert a variable of your choice. This variable will be replaced by actual value, when it shows to the player.
Maintenance
You can setup Auto Restart and Auto Update features on this tab. Auto Update feature is supported only if the DS GUI is running.
How to setup auto-restart
There are two ways how to start dedicated server and to use auto-restart:
- Server as Local / Console
- If you use DS GUI, then auto-restart is supported.
- If you don’t use DS GUI and start server as simple console application, then you have to make your own script.
- Server as Window Service
- If you use DS GUI, then auto-restart is supported. You have to keep GUI open.
- If you don’t use DS GUI, then you have to go to properties of Windows Service (Control Panel/Administrative Tools/Services). Find service of the server and in the properties there is Recovery page. Set the First failure, Second failure and Subsequent failures to Restart the Service. Also make your own task in Task Scheduler, which checks if server is running.
6. Configuration and Server controls
Save config – Saves the configuration for the current server instance
Edit config – Opens the current instance’s configuration file in a text editor for manual editing
Save & start – Saves the current configuration and starts the server
Restart – Restarts the server
Stop – Stops the server
Back to instances – Returns to the screen with the list of server instances
Exit – Closes the configuration utility (but not the dedicated server, if it is running as a service)
Setup Actions – this feature can Stop/Restart server with delay and chat message on the server.
PLUGINS MANAGEMENT
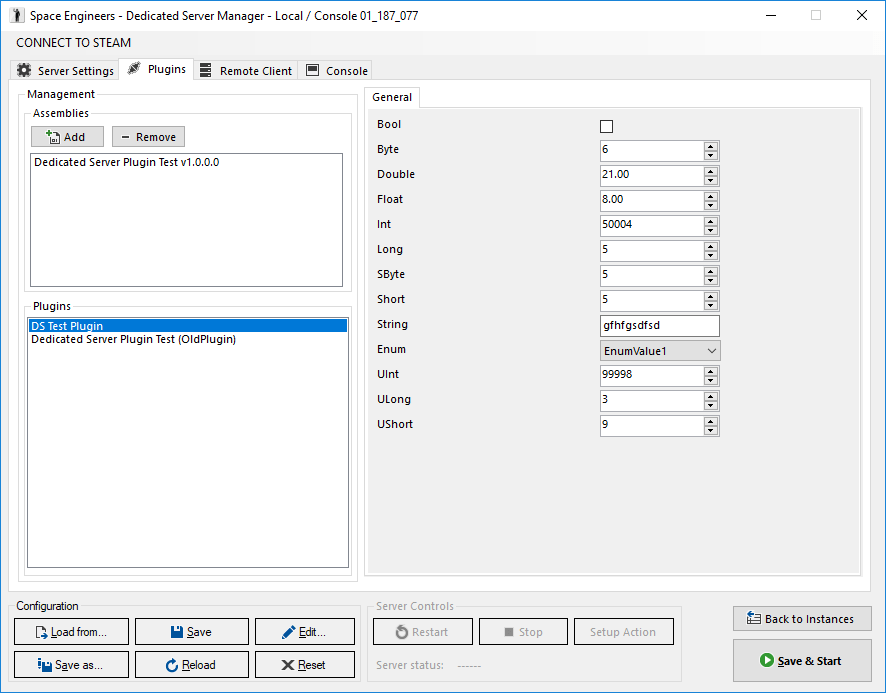
You can use plugins management for server side plugins setup. Add plugin assembly and then select plugin.
REMOTE CLIENT
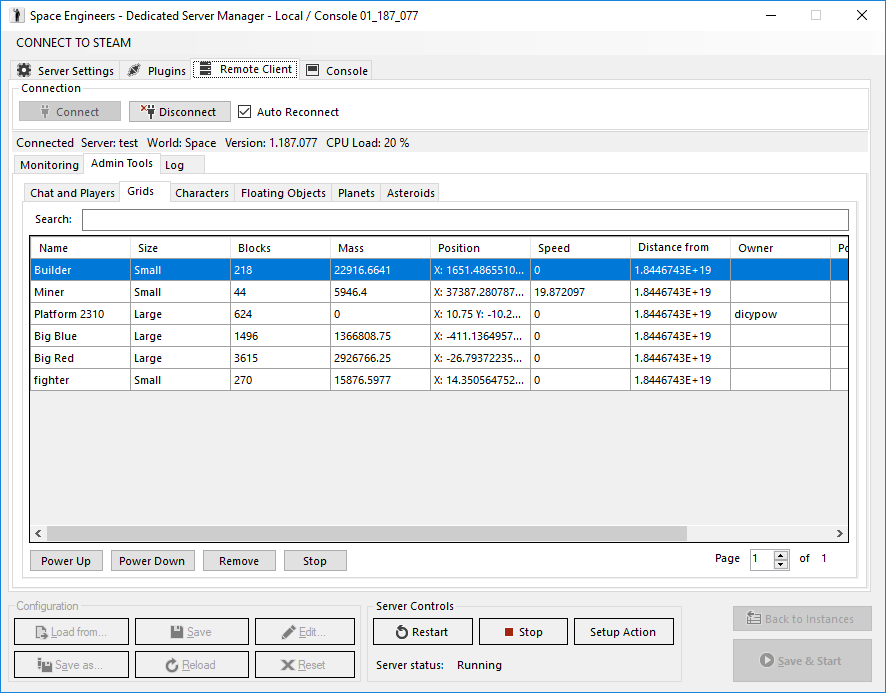
Remote Client helps you with the administering of your server without connecting to it. There is a monitoring tab with information about simulation speed and game play state.
Admin tools tab is similar to Admin Screen (alt-F10). You can see global server chat, connected, banned or kicked players, list of all grids, characters, floating objects, planets and asteroids.
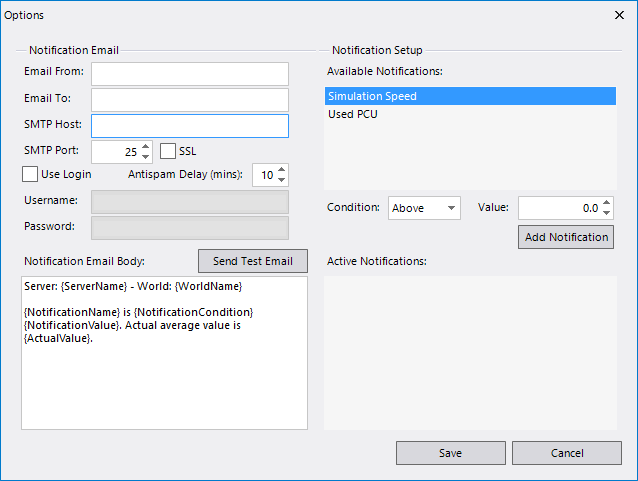
Standalone executable
There is standalone version of Remote Client in the Dedicated Server directory. You can start it by executing VRageRemoteClient.exe file. Standalone version has more features like Profiles or Notifications.

COMMAND LINE OPTIONS
You can run SpaceEngineersDedicated.exe with the following arguments
-console: skips instance selection dialog, dedicated server configuration dialog, and goes directly to console application
-noconsole: will run without black console window
-path: will load config and store all files in path specified (“D:\Whatever\Something” in example)
-ignorelastsession: ignores last automatic save of the world and uses values from config file
-maxPlayers : overrides maximum players that can be in session
-ip: overrides ip address of dedicated server stored in config file
-port: overrides port value stored in config file
taskkill /IM SpaceEngineersDedicated.exe
This will stop the dedicated server correctly, saving the world etc.
To stop it immediately add argument “/f”, which will kill the server without asking to stop and without saving the world.
CHANGING DATA DIRECTORY ON DEDICATED SERVER
To change data directory for dedicated server, mklink command may be used.
1) Make sure ‘D:\Something\DirForData’ exists
2) Make sure ‘C:\ProgramData\SpaceEngineersDedicated’ does not exists
3) Run command:
mklink /J C:\ProgramData\SpaceEngineersDedicated D:\Something\DirForData
More information here (see Junction): http://msdn.microsoft.com/en-us/library/windows/desktop/aa365006%28v=vs.85%29.aspx
ROUTER AND FIREWALL SETTINGS
a) Static IP: If you intend to run a game that people from all over the Internet can connect to, you will need a static public IP address. Your internet service provider should tell you whether you have one or not. Without the static IP address, you will be able to host a dedicated server on your LAN, but people from outside the LAN won’t be able to connect to it.
b) Port forwarding: The game uses UDP protocol to communicate. The default listen port is 27016, but this can be changed in the config tool. In order for people to be able to reach your server, you will have to configure your router to forward all incoming UDP traffic on port 27016 (or any other that you have specified) to the computer where your dedicated server is running.
c) Firewall settings: Make sure to set the firewall on your server computer to allow incoming UDP traffic on the listen port.
HOW TO FIND YOUR GROUP ID
If you want to find your Group ID, this is a way how to do it:
1) First you have to be the member of the group
2) On the group’s page (e.g. http://steamcommunity.com/groups/rps), click “Invite Friends”
3) On the new page that will open, you can find your Group ID (long number in red) in the page’s URL: http://steamcommunity.com/id/pikacc/friends/?invitegid=103582791429554934
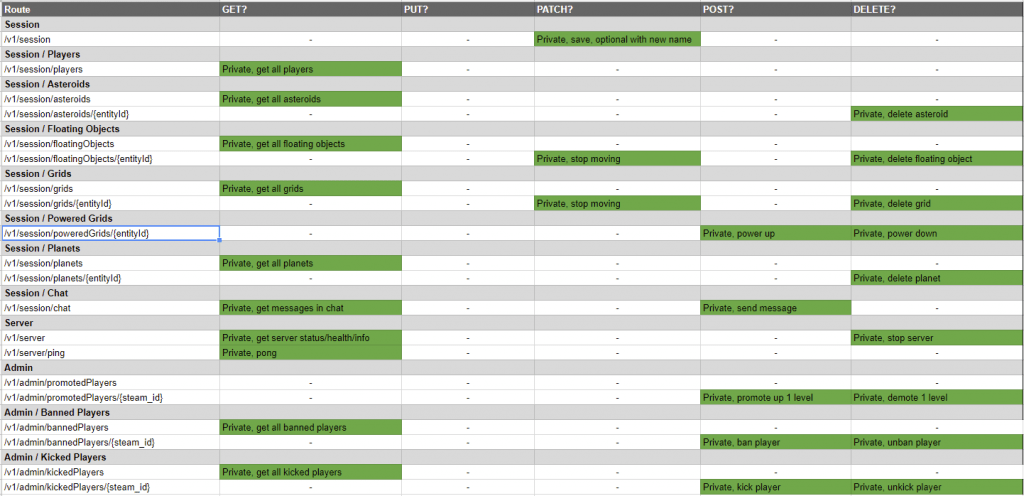
REMOTE API
Remote API is RESTful web API, which you can use to get information about the server and running world. You can use VRage Remote Client to get the data or you can make your own client. These are available resources:
Custom Client
If you want to make your own client you have to properly create a request. Remote API is using HMAC (HMACSHA1) to compute hash from specific data. HMAC is using private key. Don’t share this key with anyone.
You have to compute hash from string (lines):
URL – including query parameters
Nonce – random string, can be used only once, can be a number
Date – UtcNow, format r, RFC1123 pattern, must be added to header
This is converted to byte buffer from UTF8 string and then used to compute hash. Hash is converted to Base64 string and added to header to Authorization field in format “nonce:hash”.
Example of code in C# (using RestSharp library) :
private readonly string m_remoteUrl = “/vrageremote/{0}”;
public RestRequest CreateRequest(string resourceLink, Method method,
params Tuple<string, string>[] queryParams)
{
string methodUrl = string.Format(m_remoteUrl, resourceLink);
RestRequest request = new RestRequest(methodUrl, method);
string date = DateTime.UtcNow.ToString(“r”, CultureInfo.InvariantCulture);
request.AddHeader(“Date”, date);
m_nonce = random.Next(0, int.MaxValue);
string nonce = m_nonce.ToString();
StringBuilder message = new StringBuilder();
message.Append(methodUrl);
if (queryParams.Length > 0)
{
message.Append(“?”);
}
for (int i = 0; i < queryParams.Length; i++)
{
var param = queryParams[i];
request.AddQueryParameter(param.Item1, param.Item2);
message.AppendFormat(“{0}={1}”, param.Item1, param.Item2);
if (i != queryParams.Length – 1)
{
message.Append(“&”);
}
}
message.AppendLine();
message.AppendLine(nonce);
message.AppendLine(date);
byte[] messageBuffer = Encoding.UTF8.GetBytes(message.ToString());
byte[] key = Convert.FromBase64String(m_securityKey);
byte[] computedHash;
using (HMACSHA1 hmac = new HMACSHA1(key))
{
computedHash = hmac.ComputeHash(messageBuffer);
}
string hash = Convert.ToBase64String(computedHash);
request.AddHeader(“Authorization”, string.Format(“{0}:{1}”, nonce, hash));
return request;
}
With custom client you can get information about available resources on API URL (for example http://localhost:8080/vrageremote/api).
Block Limits
There are two different methods which can be used to customize block limits on a server. They are found inside the Block Limits tab of the Dedicated Server application.
Limiting by PairBlockName (Default Setting)
This method allows you to set limits for specific blocks. Large and small are linked, however variants are not. For example, Limiting Pistons by 6 will limit the Piston block, but not the Square Piston Block as they are a unique block. This provides fine control over which blocks are limited.
Limiting by Tag
This method allows you to set limits for groups of blocks. For example, setting Pistons to 6 will limit both the Piston and the Square Piston to 6, regardless of the variant chosen. These groupings can adjusted to your liking by creating a mod which modifies BlockTags.sbc, found in SpaceEngineers\Content\Data
Powered by your "Need to Create"
Become a Space Engineer today!
Start Creating