Visual Scripting Tool
Keen’s official guide for using the Visual Scripting Tool (VST) to create or modify game scenarios for Space Engineers.
Note: This guide assumes a base knowledge of Space Engineers and its mechanics.
GENERAL DESCRIPTION
VST was designed to allow users to design game scenarios for Space Engineers without needing previous coding experience. Mod developers can utilize this tool to create scripted gameplay events, play cutscenes, or modify game values at runtime.
Glossary of Terms
VST: Visual Scripting Tool. Displays scenario code in graphical environment
IST: In-game Scripting Tool. Screen accessed inside Space Engineers to modify in-world entities
Scenario: A custom game in Space Engineers, consisting of multiple script and data files
Mission: An individual segment of a Scenario, connected to a specific World
World: The entire game environment played in during a Mission. Can include multiple planets.
Entity: Generic term for most objects existing inside a World. Includes blocks, whole grids, Waypoints, Trigger volumes, and characters.
Waypoint: Different from GPS positions in-game, these are created with either IST or VST’s World Outliner, and mark specific positions in the World which can be referenced by VST.
Trigger: Volumes in the World which can detect when players and other Entities enter or exit their space.
Node: The base unit for visual scripting, Nodes represent an individual code function, and are connected together on the Graph to script game logic.
Graph: The visual representation of a script’s logic for editing in VST. Viewed in the Script Editor pane.
Script: A collection of game logic, represented as interconnected Nodes on the Graph
Connection Pin: The circle on the outer edges of a node. Pull connections from outputs (right side) and drag them to inputs (left side) to form a connection line
Sequence Line: White connection lines between Nodes which controls the order of node execution. Always the top-most connection on “sequence dependent” nodes.
Value Line: Connection lines between nodes for passing values from one node to another. Color-coded based on value type, such as Bools, Ints, or Strings.
Event: A type of node which begins a Sequence Line when the specified event occurs when playing the scenario.
Mission Script: Main script for gameplay code during the entirety of a Mission
State Machine: Controls flow of Objective scripts while a Mission script is running
Cursor: Location of an active State along the Sequence Line of a State Machine.
Objective Script: Higher level script which is only active during specific times in a Mission
Common Script: Modular scripts containing generalized and repeatable node logic
Start Workspace: Window which opens by default when starting VST, and provides options for creating or opening a Scenario.
World Outliner: Panel in VST which interfaces with any World currently running in an instance of Space Engineers, allowing designers to view, create, edit, and delete Waypoints outside of IST.
1. RIBBON BAR
This is where basic application functions are performed, such as saving and opening scenarios.
- Find: Search for instances of specific nodes, able to search for node titles & IDs
- Build: Test script for compile-time errors
- Code Debugger: View raw code for opened script
- Center: Reset view to 0,0 position on graph
- Snap to Grid: Draw & snap nodes grid lines on graph
- Run: Open Space Engineers & play the current scenario (in-game edits not saved)
- Run Scenario: Open Space Engineers & play the current scenario (in-game edits saved)

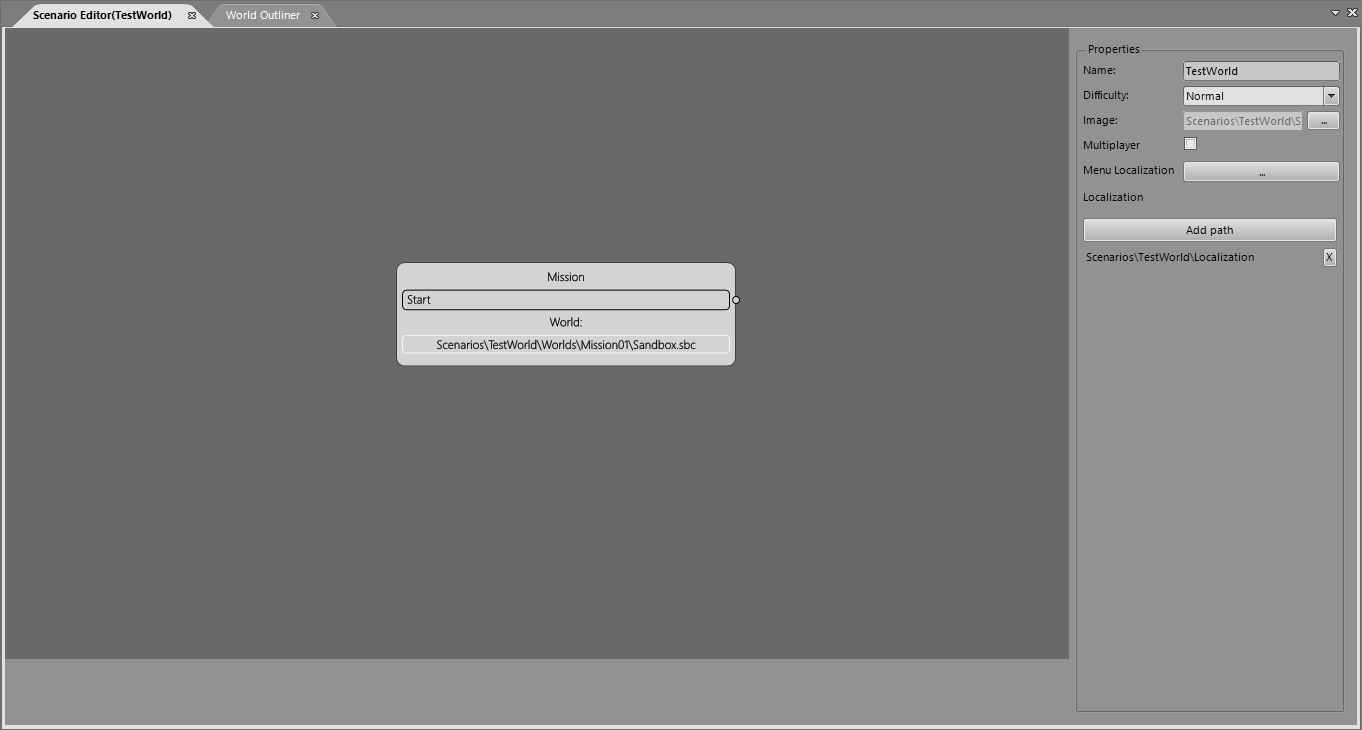
2. SCENARIO EDITOR
This tab is used for controlling over-arching attributes of the scenario, including what Missions are played and in what order, and the scenario’s difficulty rating.
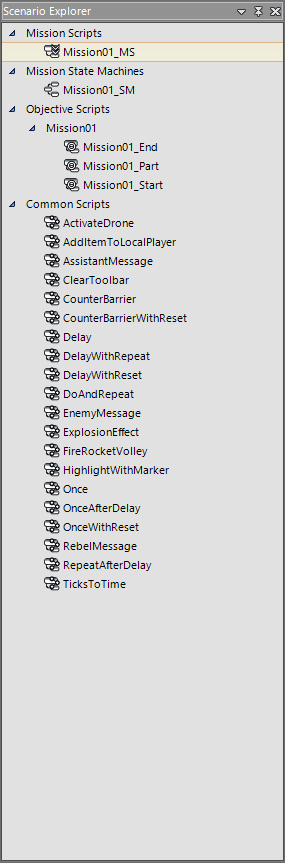
3. SCENARIO EXPLORER
This pane lists all available scripts in the open scenario. From here you can open scripts to edit, create new scripts, and drag Common scripts onto open Objective graphs.
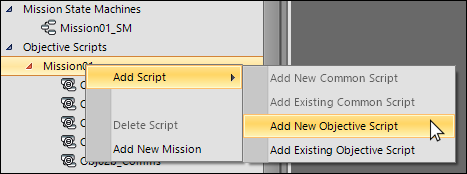
Scripts are organized by type (See Script Types section below) and listed alphabetically by file name. New scripts can be created through this pane by right clicking the parent directory you want to create or import a script under.When creating a new Mission script, VST will automatically create an accompanying State Machine script in addition to the required World directory and files. Only one State Machine can be run per Mission, so there is no need to create new State Machines by themselves.
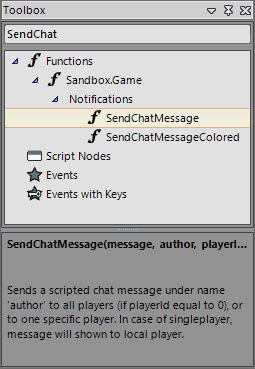
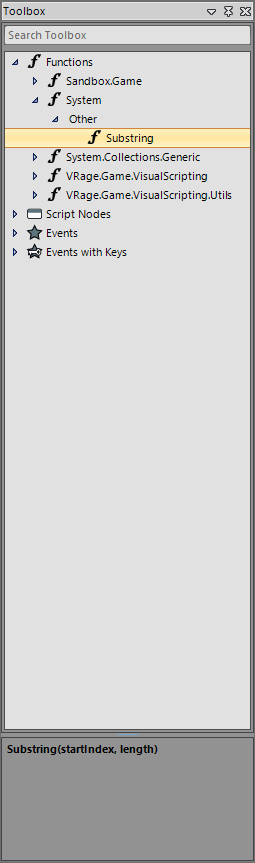
4. TOOLBOX
The Toolbox pane lists all available Nodes which can be used in Mission, Objective, and Common scripts.
Click on any item in the tree to select it. At the bottom of the pane there is a contextual description box, with a brief summary of the selected node’s functionality.
Use the search bar to look for specific nodes by name, or browse the tree for node categories, then drag and drop your selected item onto an open graph to create a new node.
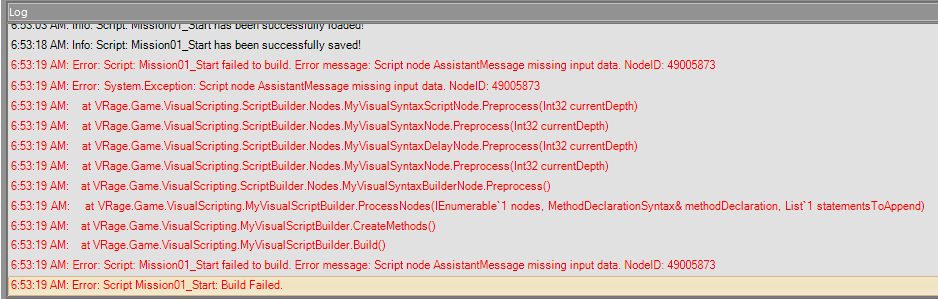
5. LOG
The Log pane is used for monitoring the state of VST. Events such as file saves and error reports will be shown here.
6. WORLD OUTLINER
This pane interfaces with Space Engineers, allowing designers to view, create, edit, and delete Waypoints inside an open World. The World does not need to be connected to the open Scenario however, and the Outliner will connect to any running game World. If no World is currently running, the Outliner will be greyed out and inactive.
The top buttons are useful for quick actions, such as adding a new Waypoint or Saving. When a new Waypoint is added via the New Waypoint button, it is created at the camera’s current position in the world. In IST the new Waypoint can be moved in 3d space with its gizmo, or have its position values set manually.

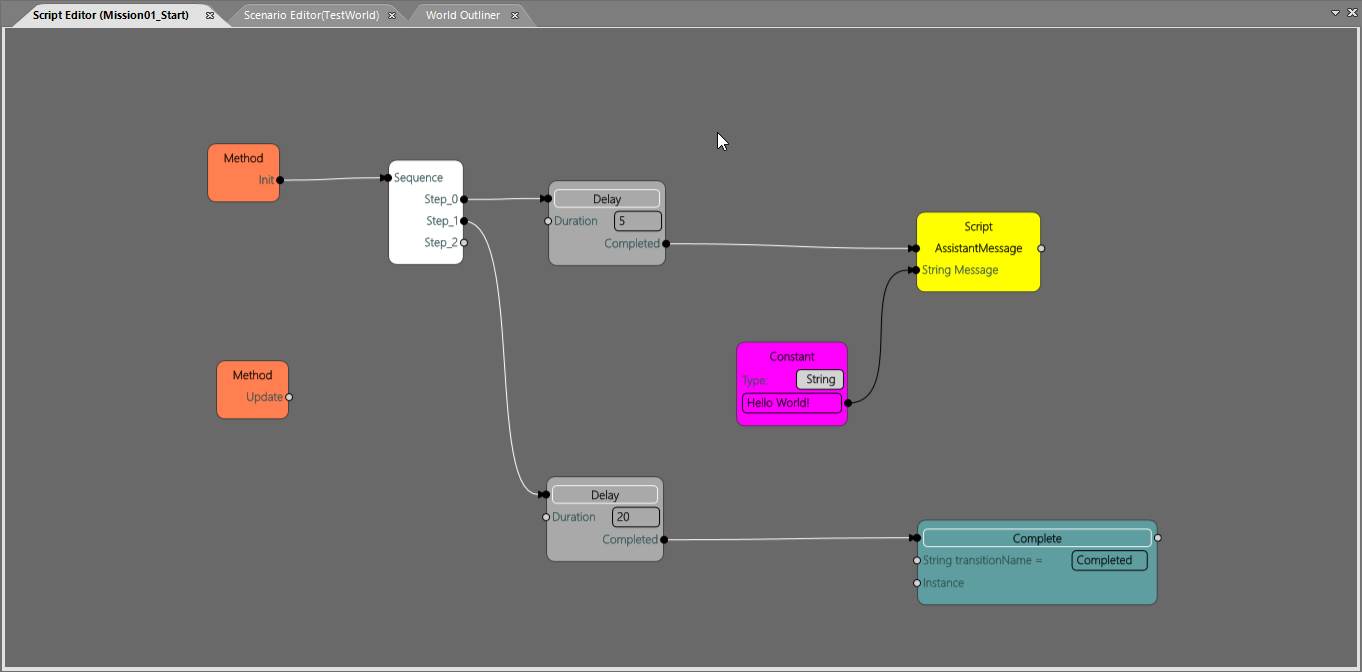
7. SCRIPT EDITOR
The Script Editor is where the majority of work is done in VST, displaying the Graphs for any Mission, Objective, or Common script you open. State Machine graphs function slightly differently, and will be discussed in the next section. All open scripts are listed as tabs at the top with their names, and can be reorganized as individual panes in your workspace.
Gameplay scripting is designed by creating and connecting Nodes in a script’s Graph in this pane. Nodes are called in sequence going from left to right along the white Sequence Line, starting at an orange Event node.
By default, all Mission scripts start with the following Events:
- GameStarted
- GameFinished
- Update
- Dispose
- PlayerDied
Objective scripts start with the following default Events:
- Init
- Update
- Deserialize
- Dispose
Common scripts only start with an Input node, though they need an Output node connected in order to call any nodes which come after it.
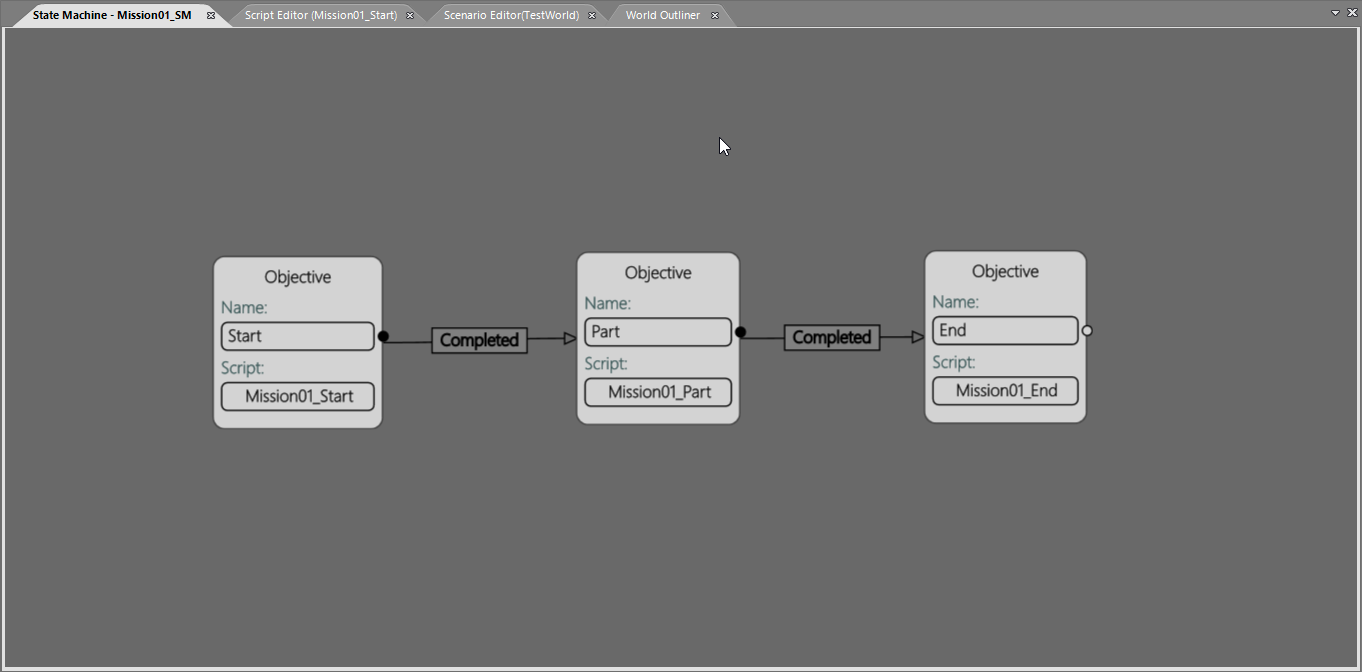
8. STATE MACHINE
The State Machine graph can be opened by double-clicking a State Machine in the Scenario Explorer pane. This Graph works similarly to the Script Editor, but only uses a small number of node types unique to State Machines:
- State
- Spread
- WaitForAll
- Final
State Machines control when and in what order Objective scripts are run, allowing for some code to only be run at specific times. While code in a Mission script is accessible at any time during the Mission, code inside Objective scripts are only accessible when a State Machine is running the Objective.
A State Machine can be started from a Mission script by calling the StartStateMachine node. Using a State Machine to run Objective scripts allows you to better organize and optimize your scripts, but it is not required.
States can be connected through transitions, which determines the order in which the states will be run. Each transition has a name given when it is made, which must be referenced when completing an Objective script.
When a State Machine is started, it begins by running the state denoted in the World’s Sandbox.sbc data file under the VisualScriptManagerSessionComponent section. If this node is deleted and no longer exists on the Graph, Space Engineers will select a different node with no incoming connections as the initial state to run.
To progress the State Machine’s Cursor to the next state, the Objective script needs to call a Complete node, and specify the name of the transition to progress down. This stop the current Objective, and begins running the Objective associated with the connected State in the named transition.
GETTING STARTED
Opening VST
- In your Steam Library, search for “Space Engineers – Mod SDK” under Tools
- Install if needed, then click Launch to open the SpaceEngineersModSDK folder
- Open the Tools folder, then the VRageEditor folder. Run VST.bat
- Helpful tip: Make a shortcut to this Batch file for easier access!
- If this is your first time running VST, you’ll be prompted to “Select Content folder of the game.” Navigate to the Steam installation folder on your computer, and select …\Steam\steamapps\common\SpaceEngineers\Content\
When opening VST you’ll be presented with the Start workspace, which shows options to start a New Scenario or Load Scenario.
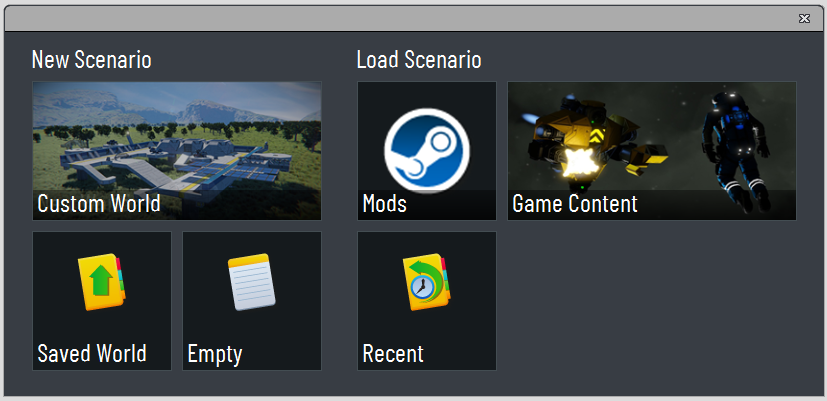
Creating A New Scenario
New scenarios can be created from:
- Custom World: Stock environments such as Green Station, Crashed Red Ship, and more
- Saved World: Your saved game environments, located in \AppData\Roaming\SpaceEngineers\Saves\
- Empty: A default blank world
- Run VST, or click New on the Ribbon Bar to open the Start workspace
- In the Start workspace window, click Empty under New Scenario
- Enter a name for your new Scenario
- Scenario is set up and opened. All associated files can be found in \AppData\Roaming\SpaceEngineers\Mods\*Your Mod Name*\
Playing Your New Scenario
If Space Engineers is already running, you can open your scenario by selecting New Game on the Main Menu, then scrolling down the list of official scenarios to view your Local scenarios. These local scenario directories can be found in your AppData folder for Space Engineers, in the \AppData\Roaming\SpaceEngineers\Mods\ folder.
You can open Space Engineers and directly load directly into your scenario by clicking “Run” on the Ribbon bar. The “Run Scenario” button can be used to also save all changes directly to the scenario folder in \Mods\, rather than to your \Saves\ folder, making it easier to edit and save changes to your World. This method requires that Space Engineers not have any instances already running on your computer.
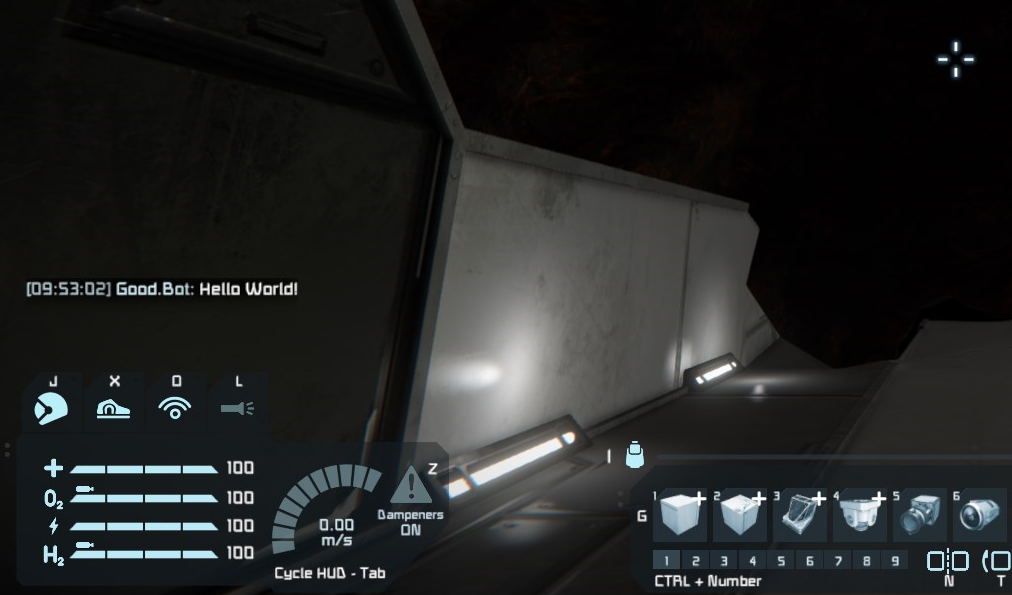
When the game has finished loading and you gain control of the character in the world, the GameStarted Event in the Mission script will be called. If you left the StartStateMachine node connected to this event, the State Machine will also start running its first State node’s Objective script, and the code prints a Hello World message to the Chat window.
Detecting Your Events
Regardless of what kind of scenario you’re making, all scripting in VST begins with Event nodes. These nodes fire when their associated event takes place in the game. GameStarted, for instance, fires immediately when the scenario begins for the first time, and any connected nodes will be called when that happens.
The easiest Event node to begin scripting with is ButtonPressedTerminalName, which fires any time a button panel is activated in the game. This event is great for causing scripts to run at specific times, since the player has direct control over when it fires.
It can sometimes be difficult to know what specific code is running in your script, since many nodes do not produce visible changes in the level. An easy way to debug your code is to use the SendChatMessage node to print messages to the in-game Chat window. Printing messages this way can help you determine when an Event is firing, as well as enables you to print variable values through the message field.
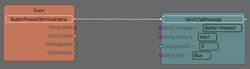
Connecting all this together, you can make a simple interactable button with ButtonPressedTerminalName and SendChatMessage nodes. Click and drag both of these nodes from the Toolbox pane onto an empty area on your Mission Graph. Then, click and drag the white circle at the top right side of the Event node. Notice the visual changes to the connection pins on the SendChatMessage, with solid red pins being incompatible, and white empty pins being valid input pins. Drag the connection line to the top white circle on SendChatMessage, and release when the connection line turns orange.
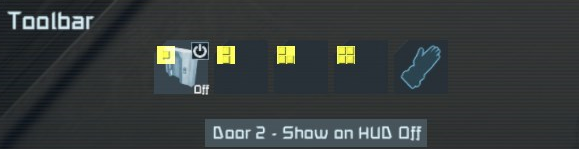
Next, click Run Scenario on the Ribbon bar to launch Space Engineers and load directly into this scenario with saving enabled. When you gain control of the character, create a button panel block, and assign any block action to the first slot.
Now you are able to press the button, and print your chat message! Save your game to retain your changes.
Next, we can add logical statements to the code to better control what happens and when.
Making Your Code Smarter
In the previous section you created a simple button event, connected to a chat message node. Since there are no logical checks, and the Event node is on the Mission script’s Graph, this message will be printed to the Chat window when any button is pressed at any time during the Mission. You can easily constrain this code to only one specific button by checking some of the event’s parameters.
First, you’ll need to have a Branch node connected along the Sequence Line between the Event and the SendChatMessage nodes. Branch nodes check a boolean value, much like a traditional If / Else statement, and only executes one of its two output connections. We’ll use this Branch node to check the name of the button panel block provided by the Event node, so connect the True output to the SendChatMessage node.
Next, click and drag the magenta circle to the right of “String name” at the top of the ButtonPressedTerminalName node, and release it in an open area of the Graph. This displays the Function Selection window, allowing you to quickly search for and place a node with the dragged connection. Click into the Search field, type “String Contains”, and double click the returned item. The node is created on your Graph, and it is automatically connected to the name output of your Event node.
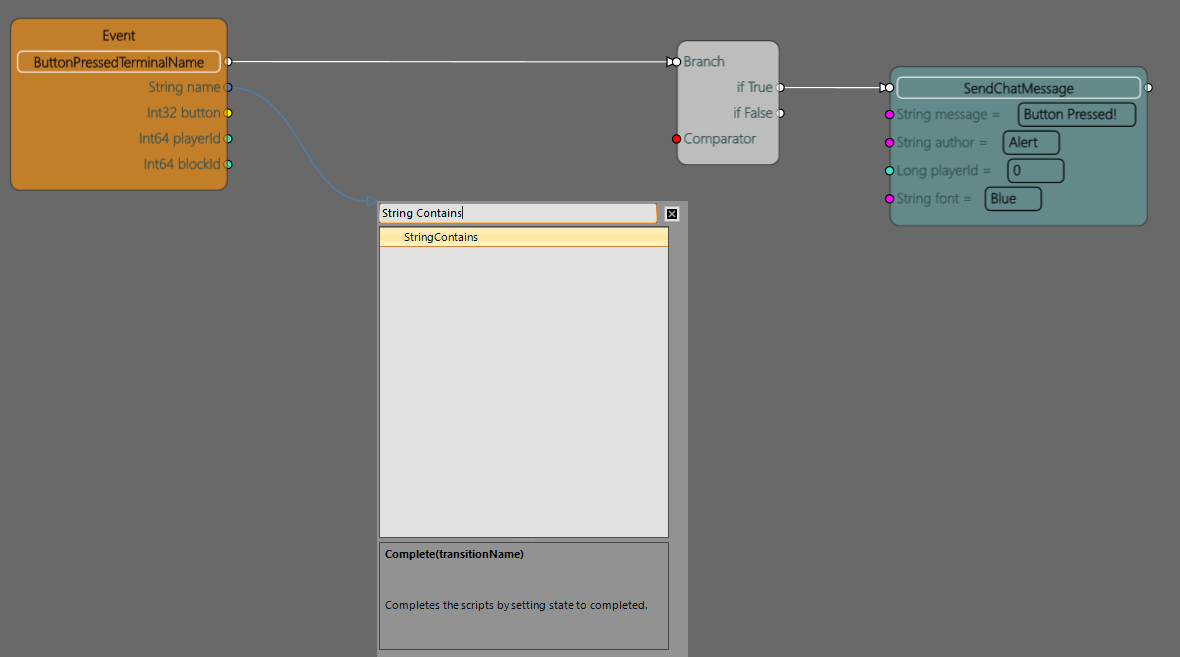
StringContains is a great way to analyze strings such as Entity names, and determine if a sample string can be identified within the value string. For our event, we’ll want to check the button panel’s terminal name, and only print the message if it contains a specific string. Double click into the “contains” field on the StringContains node, type “test”, then click “OK” to confirm. This will cause the StringContains to evaluate “true” for its output boolean value only when the Event’s output name string contains the word “test”.
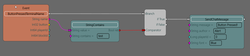
Now connect the “ret” output pin to the “Comparator” input pin on the Branch node, and the True output of the Branch node to the SendChatMessage node from earlier, so it will print for any button with “test” in its terminal name.
To test your changes, click Run Scenario in the Ribbon bar to load your scenario. Pressing the button no longer prints the chat message, because the block’s terminal name does not contain the string “test”.
Open the panel’s terminal, and click the Name field to edit the block’s name. Adding the test string to the name will now allow the chat message to print. Keep in mind that StringContains is case sensitive, so adding “Test” or “TEST” to the terminal name will evaluate to false in our logic.
Next, we’ll learn how to start and progress through a series of Objective scripts via the State Machine. Don’t forget to save your changes to retain the updated terminal name!
Progressing Through Your Mission
In the previous section, you learned how to target a specific button by name, but it is still accessible at any time during the Mission. Moving the nodes into an Objective script allows the code to only be run during specific States.
First, click and drag in an open space on the graph to create a selection box. Drag the box around the Event, Branch, and SendChatMessage nodes, and release to select all the newly created nodes. Press Ctrl+C on your keyboard to copy these nodes to your clipboard.
Next, open the Mission01_Start Objective script by double clicking it in the Scenario Explorer pane. Press Ctrl+V on your keyboard to paste the nodes into the Objective script. Now that you have successfully pasted the nodes, return to the Mission script and delete the selected nodes there. The button can now only print your message when the Start state is active.
By default, new scenarios are set up with code to start the State Machine on GameStarted, and print a Hello World message before moving to the Part state. Go back to the _Start Objective script, and move the Complete node from the Init event to the end of your ButtonPressed event. This way, the State Machine will not progress past this state until the test button is pressed.
Save the scenario, and click Run to launch your scenario. Now the button will only print your message once, and never again. This is because after the first press, the Start state is completed and exited, and code in this State is no longer accessible during play until the scenario is restarted.

Using the State Machine and Objective scripts in this way can allow you to design unique scripted events, and control when they are called during your scenario. It also helps keep the scripts stay organized and optimized, since large amounts of nodes can slow down viewing a script in VST.
Next, we’ll go over how to post your new scenario online for other players to experience.
Publishing Your Scenario
Once you’re happy with how your scenario plays, you should get it ready to share it online! Publishing to the Steam Workshop is quick and easy, but first you’ll want to set up a few things to help it stand out.
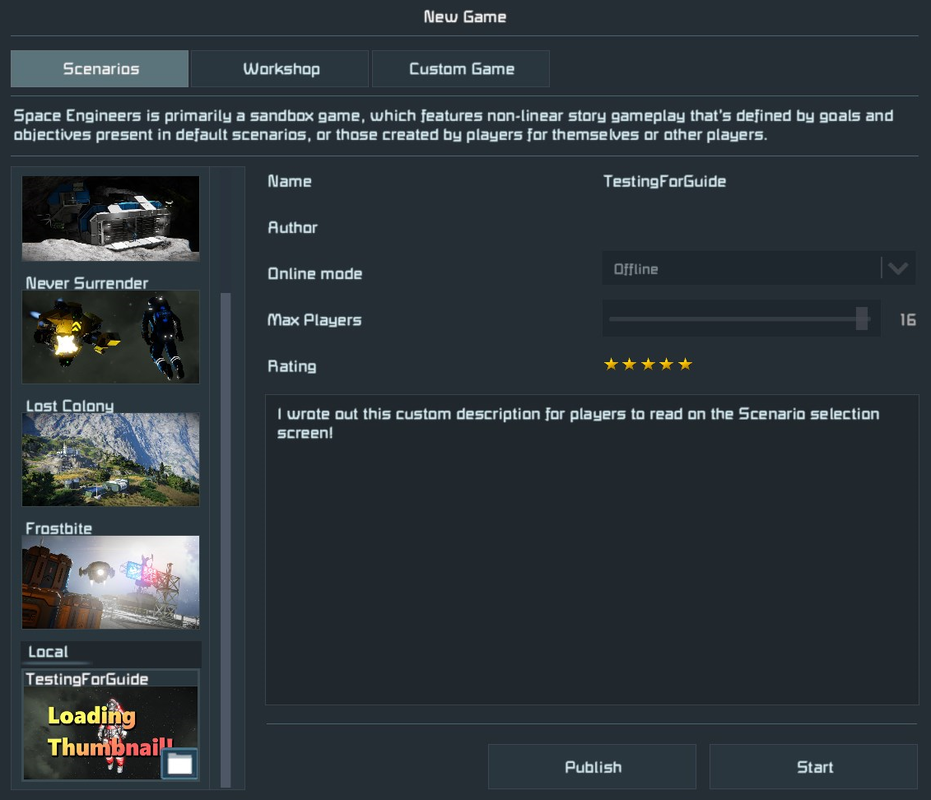
The thumbnail and loading images are located in the \Mods\ScenarioName\Scenarios\ScenarioName\Screens\ folder. You can edit these image files, or select a different image on the Scenario Editor pane in VST. “Scenario” is the thumbnail image, and each Mission will have its own loading image named after it.
In order to set your scenario’s description, you’ll need to open your scenario’s .SCF data file in a text editor program, such as Notepad. You can find this data file in the \Mods\ScenarioName\Scenarios\ScenarioName\ folder, and it will be named the same as your scenario’s name. Between the <Description> and </Description> tags, you can write out a custom description to display to players on the Scenario selection screen.
After you’ve set up these cosmetic extras, your scenario is ready to publish. On the Main Menu for Space Engineers, click New Game to view the Scenario selection screen. Here you can review your changes to the thumbnail and description, and click Publish at the bottom when you’re ready to share.
Once you confirm that you want to Publish, your new scenario will be added to the Steam Workshop for other players to enjoy.
Thank you for adding your amazing creations to the Space Engineers experience!
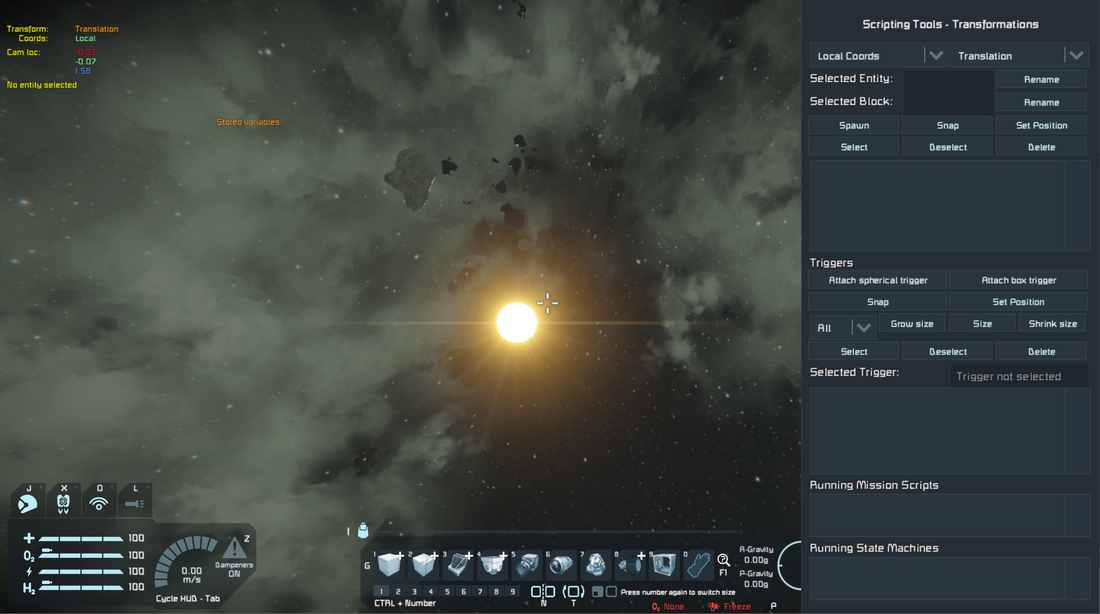
USING IST
The In-game Scripting Tool (IST), also known as the “Scripting Tools” screen, is used to create and modify entities in a World. IST is ideal for placing Waypoints, creating Trigger volumes, and naming grids or blocks for referencing with VST.
Accessing the Screen
- Open Space Engineers
- Run a scenario you want to work on, such as the one created in the previous section
- On the keyboard, press the F11 key twice
- Press the Esc key to return to controlling your character
Setting Up Waypoints
- In the upper right section of the screen, click Spawn to create a new Waypoint entity at the camera position
- Click and drag the gizmo handles to modify the Waypoint’s position or rotation (transformation type in the upper right, or switched with the R key)
- Move the camera, and click Snap to teleport the Waypoint to the camera’s current position
- Click Set Position to manually enter a position vector
- Click Rename to the right of the Selected Entity name to set a custom name for the Waypoint
Setting Up Triggers
- With the Waypoint still selected, click “Attach spherical trigger” to create a new trigger volume at the camera’s position
- Provide a name for the new trigger
- Move the camera to view the new trigger
- With the trigger selected, click Size and type 10, then click Confirm
- Select the Waypoint, and use the gizmo handles to move the Waypoint, which moves the trigger volume as well.
- Below the “Selected Trigger” field. Double click the trigger’s name to enter a new name
Working with Grids and Blocks
- Click on a grid to select it
- Click and drag the gizmo handles to move the grid
- Click Rename to the right of Selected Entity to enter a new EntityName for the grid
- Click on a functional block (Ex: Button Panel, Thruster, etc) to select it
- Click Rename to the right of Selected Block to enter a new EntityName for this specific block
- Click Attach box trigger to create a new trigger volume attached to this specific block
- Move the grid, which moves the trigger volume as well.
SCRIPT TYPES
There are four basic types of scripts you can create and implement to control what happens in your Scenario.
1) Mission Scripts:
These are the main scripts for a Scenario, and are set up in sequence on the Scenario Editor tab. A Scenario can have multiple Missions, but only one Mission can be run at a time. Each mission requires its own World, which is generated automatically when creating a new Scenario or Mission script.
These scripts begin running when the game is loaded, based on their order in the Scenario Editor tab, and will run until the SessionClose node is executed. Events and logic in this script can run at any point while playing this Mission.
To create a new Mission in your Scenario, right click in the Scenario Explorer and select Add New Mission. You will be prompted to input a Name, select a World and Loading Image to use as templates, and input an optional Loading Text. After clicking Create VST will generate a new Mission script, State Machine, and all required World files.
Default Events:
- GameStarted: Fires once when Scenario is first run (not when reloading a save).
- Update: Fires once per frame while Mission is active
- PlayerDied: Fires any time a player character dies
To transition between Missions during play, the node SessionClosed will need to be executed. This will close the current Mission, and load the next World as defined on the Scenario Editor tab. If the current Mission is the last in the sequence, SessionClosed will exit the Scenario and return the player to the Main Menu.
2) State Machine Scripts:
These scripts control the flow of individual Objective scripts in sequence during a Mission. The State Machine can be started from any script with the StartStateMachine node. Each State in the State Machine represents a specific Objective script, which are connected through Transition connections. States without input Transitions will be treated as starting nodes, and run when the State Machine is started.
All Transitions have an identifying name, which is input when connecting two States and creating the Transition. The Cursor moves along Transitions, activating the Objective scripts associated with its current State. To move the Cursor from one State to the next during play, the associated Objective script must execute the Complete node and specify the Transition name.
The flow of execution through these States can also be controlled by the Spread and WaitForAll nodes. Spread takes a single input Transition and branches to multiple States simultaneously. WaitForAll can take multiple input Transitions, and only progresses to the next State when all input Transitions have completed.
3) Objective Scripts:
Specific scripts that are only run at certain times during the mission, and controlled by the State Machine. Code in these scripts do not run if a State Machine Cursor is not active on its State. When a Complete node is executed in an Objective script, the script is stopped and the Cursor moves to the next State in the State Machine.
Objective scripts are useful for segmenting your code, and only running what is needed to at a given time. This can keep your Scenario organized, making it easier to navigate and debug, as well as maintain steady run-time performance.
Default Events:
- Init: Fires once when Objective script first starts
- Update: Fires once per frame while Objective is active
4) Common Scripts
This script type is used for generalized, modular logic which can be repeated multiple in places. Common scripts can be placed in Mission or Objective scripts as nodes by clicking and dragging them onto a graph from the Scenario Explorer pane.
Two node types are specific to Common scripts: Input and Output, which mark the beginning and end of the Common script respectively. Both of these nodes can have parameters added to them, allowing for variables to be passed in or returned out.
NODES
Nodes are graphical representations of a self-contained function, and can be connected in sequence to create new game behaviors without needing to write out code.
New nodes can be created on a graph in a number of ways:
- Click and drag from the Toolbox pane
- Right click an empty space
- Click and drag a different node’s connection pin and release in empty space
Nodes can be connected via Sequence Lines, Value Lines, or both. To connect two nodes, click and hold a Connection Pin from one node, and drag it to an accepting Pin on another node. To accept the connection, both pins must share the same connection type. For instance, a Sequence Line connection can only be made between two Sequence type Connection Pins, while an integer Value Line connection can only be made between two integer type pins. Accepting pins will display hollow circles when dragging a connection, while invalid connections will display solid red circles.
Nodes can either be considered “sequence dependent” if they require a Sequence Line input to function, or “sequence independent” if they do not. Sequence dependent nodes have a connection pin to the left or right of their title, and are executed one at a time along a Sequence Line. Sequence independent nodes only have connection pins next to their values, and will be executed when their output values are referenced by a sequence dependent node.
-Types
-Events:
-Begins a Sequence Line execution when the associated event occurs in the game.
-Single Sequence Line output and parameter pins, no input pins
-Dark orange
-Key Events:
-Functions similarly to normal Events, but with user-specified “key” values
-Only fires when parameters with the specified values are triggered
-Functions:
-Methods loaded from C# libraries
-Input and output connections for parameters
-Green
-Script Nodes:
-Basic nodes for performing specific actions
-Includes sequence controllers, variables, and logic gates
-Colors vary
To view more information about a specific node, select it in the Toolbox to display details at the bottom of the pane.
Powered by your "Need to Create"
Become a Space Engineer today!
Start Creating